Many people have asked us about exercises they can do while traveling, during the holidays or at home when they just can’t get to the gym – well, ask and ye shall receive. Below you will find 7 different exercises you can do with no equipment. There are some upper body, some low body and some core exercises – a nice little variety. We have also listed the various progressions (from beginner to advanced). Remember, you all know your body better than anyone so please use some common sense – don’t jump right into the advanced level if you haven’t been exercising. Start at the beginner level and progress. It’s also a good for some of you advanced people to go back to the basics and make sure you have good form and stability.
For professional guidance please don’t hesitate to ask one of us for help. We are here to help. If you are new to exercise or before beginning any fitness program, always see a qualified healthcare provider for advice and to address any questions or concerns. The exercises presented in this workout and on this website are for suggestion only and should not be substituted for medical diagnosis or treatment. Participate at your own risk and stop if you feel faint or experience shortness of breath.
SUPERMAN: (Back, Abs, Glutes, Shoulders – Beginner)
- Start by lying on your stomach on a mat or the floor with your legs outstretched behind you. Your toes are pointing toward the wall behind you. Reach your arms out overhead with your palms facing each other. Relax your neck and align your head with your spine.
- Deepen your abdominal and core muscles to stabilize your spine, exhale and slowly and strongly reach both legs away from your torso until they lift a few inches off the floor. At the same time float both arms a few inches off the floor. Keep both legs and arms straight and don’t allow any rotation in the arms, legs, shoulders or pelvis. Your head should be aligned with your spine. Do not allow your head to lift up or to droop toward the floor. Keep a nice Do not allow the back to arch. Hold this position briefly.
- As you lower down – gently inhale and lower your legs and arms back to your starting position without any movement in your low back or hips.

Note: If you have not been exercising start with begin with just lifting 1 arm and opposite leg and then progress to lifting both legs and arms. Make sure you have good core control and do not allow the back to arch.

PUSH-UPS: (Arms, Chest, Shoulders – Intermediate)
- To begin, come to a hands and knees position (quadruped) on the mat with your hands directly under your shoulders; fingers facing forward, or slightly inward and knees under your hips. Engage the abdominals and pull the shoulder blades down your back.
- Reach one leg out and away followed by the other leg, bringing you to plank position. Keep the abdominals/core engaged to brace the torso. Your head should be aligned with your spine. Your feet are together with your toes tucked under and your heels reaching toward the wall behind you.
- Slowly bend the elbows, lowering your body toward the floor. Keep the torso rigid and the head aligned with your spine. Do not allow your low back or ribcage to sag or your hips to hike upward. Engage your butt (glutes) and thigh (quadriceps) muscles to help maintain stability and a rigid body. Try to lower yourself until your chest or chin touch the mat or floor. Your elbows should stay close to the sides of your body or be allowed to flare outwards slightly.
- Press upward through your arms, straightening the elbows. Keep the torso rigid and head aligned with your spine. Imagine pushing the floor away from you. Do not allow your low back to sag or your hips to hike upward.
- An alternative position is to keep your fingers facing forward and your elbows close to your sides during the downward phase. This shifts the emphasis from the chest muscles onto the triceps and may reduce stresses in the shoulder joint.

Pushing through the outside surface and heel of your palm provides greater force in your press and stability to your shoulders.
Note: Beginners should begin on their knees and work up to starting from plank position. Advanced exercisers can lift one leg on the down and up. Make sure to prevent low back from sagging.

FRONT PLANK: (Abs, Back – Intermediate)
- To begin lie on your stomach on an exercise mat or floor with your elbows close to your sides and directly under your shoulders, palms down and fingers facing forward. Engage your abdominal/core muscles. It should feel like you are tightening a corset around your ribs, waist and lower torso. Contract your thigh muscles to straighten your legs strongly and flex your ankles, (tucking your toes towards your shins).
- Slowly lift your torso and thighs off the floor or mat. Keep your torso and legs rigid. Do not allow any sagging in your ribcage or low back. Avoid hiking your hips into the air or bending the knees. Keep the shoulders away from the ears (no shrugging). The shoulders should be directly over your elbows with your palms facing down through the entire exercise. Continue to breathe, keeping the abdominals strong while holding this position. Try holding this position for 5 seconds or more.
- Keep the torso and legs stiff as you slowly and gently lower your body back towards the mat or floor. If you experience any pain in the low back with this movement, stop the exercise immediately and consult with your doctor.

Note: the beginner move to the plank is the bird dog. Start on all fours and extend 1 arm and opposite leg. Hold for 30 seconds and then repeat on other side. The advanced move is perform plank on your hands instead of elbows and then progress to extending one arm. Keep a strong core, engage shoulders and do not allow the back to arch.

SQUAT JUMPS: (Glutes/Hips, Legs – Thighs – Intermediate)
- To begin stand with your feet hip-width apart, arms by your sides. Pull your shoulder blades down and engage your abdominals /core muscles to brace your spine.
- Shift your hips back and down. This will create a hinge-like movement at your knees. Continue to lower yourself until you feel your heels about to lift off the floor. Try to maintain a flat back by bending forward at the hips. Keep your head directly facing forward and position your arms where they offer the greatest degree of balance support.
- Jumping Movement: With ONLY a very brief pause at the bottom of your downward phase, explode up through your lower body, fully extending your hips, knees and ankles. As your jump into the air, try to keep your feet level with each other and parallel with the floor.
- Landing: The most important components of the landing phase are correct foot position and avoiding excessive forward movement in your lower extremity, which places additional stress on your knees. Try to land softly and quietly on the mid-foot, rolling into the heels. Always push your hips back and down to absorb the impact of landing. Do not lock out your knees on your landing. Land with your trunk slightly forward, head aligned with your spine and back rigid or flat. Keep your abdominal / core muscles engaged, bracing your torso to protect your spine.

Note: We suggest you first learn how to squat and land before EVER attempting to jump. Once you have mastered the hip-hinge mechanism, begin with small jumps, but emphasize your landing mechanics. Only progress to more explosive jumps once you have mastered your landing mechanics.

FORWARD LUNGES: (Abs, Butt/Hips, Legs -Thighs; Intermediate)
- To begin stand with your feet together, arms raised in front to shoulder height, and elbows straight. Pull your shoulders blades down and back without arching your low back. Brace your abdominal muscles to stabilize your spine.
- Slowly lift one foot off the floor, balancing on the standing leg. Avoid any sideways tilting or swaying in your upper body and try not to move the standing foot. Hold this position briefly before stepping forward. The raised (swing) leg should contact the floor heel first, slowly shifting your body weight to the front foot. Avoid any sideways tilting or swaying in your upper body and try not to move the foot.
- As you lunge forward, focus on dropping your hips downward toward the floor rather than forward. Continue lowering your body to a comfortable position or until your front thigh becomes parallel with the floor and your shinbone is in a slight forward lean.
- Firmly push off with your front leg, working your thigh and butt muscles, to return to your upright, starting position.

Note: the beginner move for the forward lunge is a single leg stand and then progress to forward lunges.
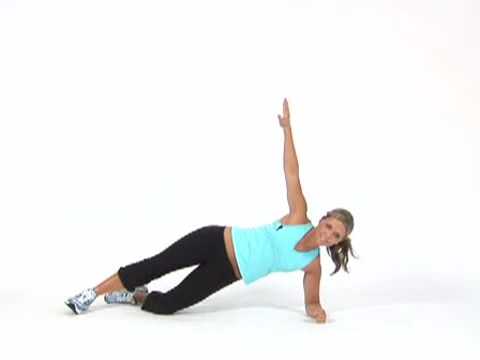
SIDE PLANK: (Abs, Butt, Hips – Intermediate)
- Starting Position: Lie on your right side on an exercise mat with your legs straight and the left leg stacked directly on top of the right. Bend the right elbow and place is directly under your shoulder. Align your head with your spine and keep your hips and right knee in contact with the exercise mat.
- Exhale, keep the abdominals engaged to brace your spine. Lift your hips and knees off the mat. The side of your right foot stays in contact with the mat. Keep your head aligned with your spine and your right elbow positioned directly under your shoulder.
- Inhale and gently return to your starting position. After a prescribed number of repetitions, repeat on the other side.

- Exercise Variation: You can increase the intensity of this exercise by (1) increasing the length of time you are in the raised position, (2) raising the upper leg off the lower leg. When raising the upper leg off the lower leg, there is no need to raise it to a level beyond parallel with the floor.
- Beginner move is to start with the bottom leg on the floor.
GLUTE BRIDGE: (Abs, Butt, Hips – Beginner Level)
- Start by lying on your back on an exercise mat or the floor in a bent-knee position with your feet flat on the floor. Place your feet hip-width apart with the toes facing away from you. Gently contract your abdominal muscles to flatten your low back into the floor. Attempt to maintain this gentle muscle contraction throughout the exercise.
- Gently exhale. Keep the abdominals engaged and lift your hips up off the floor. Press your heels into the floor for added stability. Avoid pushing your hips too high, which can cause your low back to arch. Keeping your abdominals strong helps to prevent excessive arching in the low back.
- Inhale and slowly lower yourself back to your starting position.

Progression: Gradually progress this exercise by starting with both feet together and extending one leg while in the raised position. Avoid arching your low back as you press your hips upward, which normally occurs if you attempt to push your hips as high as possible. This can be achieved by contracting your abdominal muscles prior to lifting, and keeping them engaged throughout the lift.
with help from ACE Fitness, 2015